Publishing Your Cookie Banner
Deploy your cookie consent banner to production and start collecting consent.
Deployment Overview
Once you've configured your cookie banner and preference center, it's time to deploy. Our system generates a single script tag that you add to your website. This script handles everything automatically.
One Script
Just one line of code to add to your website
CDN Delivered
Fast loading from our global CDN network
Test First
Preview in staging before going live
Understanding Script Types
We provide two different scripts for different environments:
Test Script (mode=test)
- •Use in development and UAT environments
- •Works on any domain for testing purposes
- •Not intended for production use
Production Script (mode=production)
- •Use only on your production website
- •Domain-locked to the site it was created for
- •Will not work on other domains
Critical: Domain Restriction
The production script only works on the authorized domain/path shown in the Domain Restriction section. Using it on other domains will fail to load. Always use the test script for development and staging environments.
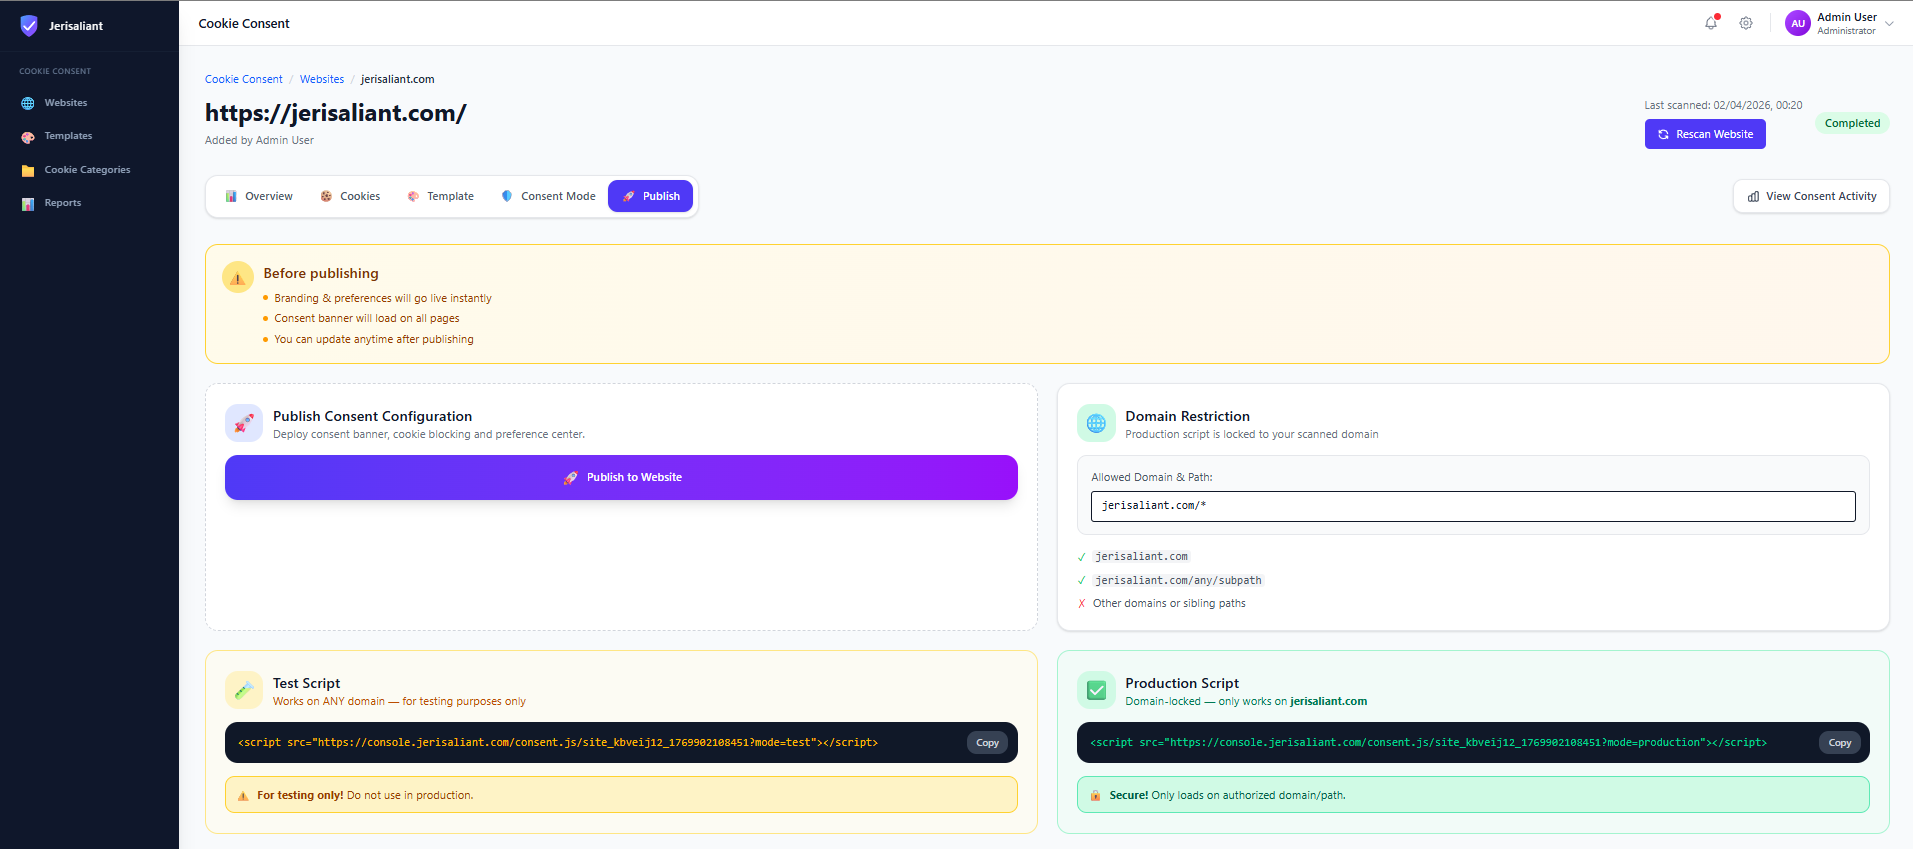
Getting Your Scripts
Navigate to Publish Tab
Go to your website settings and click on the Publish tab.
Publish tab interface
Screenshot placeholder
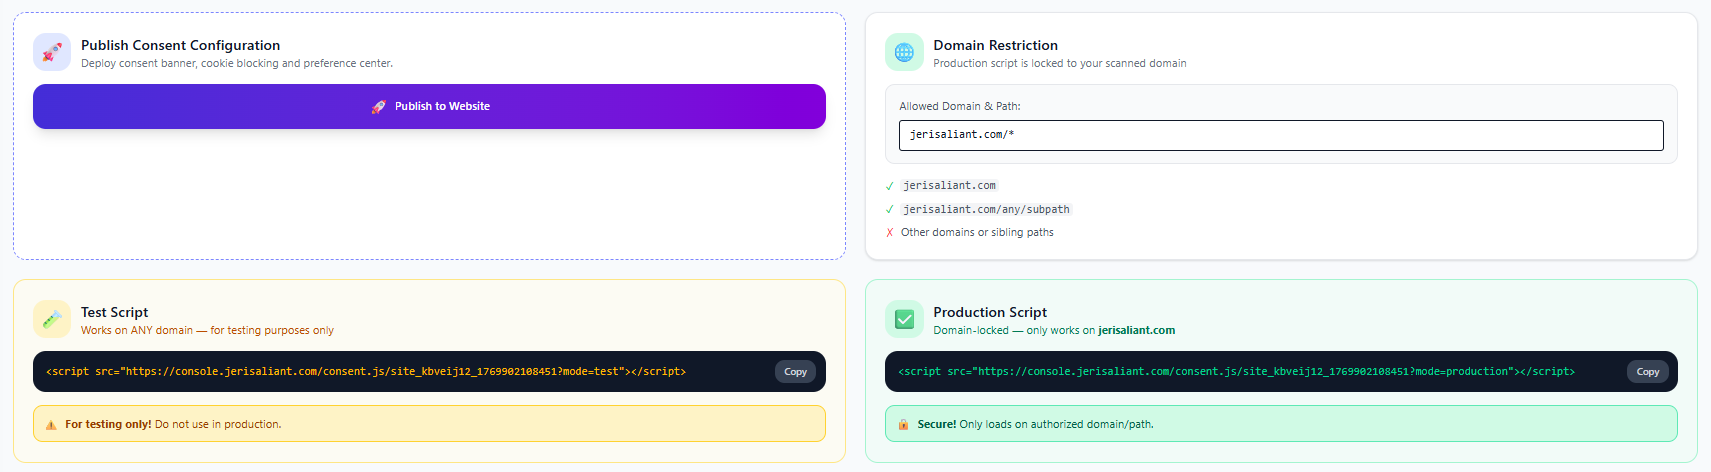
Choose the Right Script
You'll see two script options:
Test Script
Development / UATUse in localhost, dev.yoursite.com, staging environments
Production Script
Production OnlyDomain-locked - only works on yoursite.com (the scanned domain)
Copy the Appropriate Script
Click the Copy button next to the script you need.
Installation script codes
Screenshot placeholder
Script Installation
Add the script to the <head> section of your website.
Test Script Example
<!-- Jerisaliant Cookie Consent - TEST MODE -->
<script
  src="https://console.jerisaliant.com/consent.js/site_level_132_1763902188451?mode=test"
></script>
<!-- End Jerisaliant Cookie Consent -->
✅ Use in development, localhost, staging, UAT environments
Production Script Example
<!-- Jerisaliant Cookie Consent - PRODUCTION -->
<script
  src="https://console.jerisaliant.com/consent.js/site_level_132_1763902188451?mode=production"
></script>
<!-- End Jerisaliant Cookie Consent -->
🔒 Domain-locked - only use on your production site (jerisaliant.com)
CRITICAL: Script Must Be First in <head>
Place this script above all other scripts in your <head> section, especially before:
- • Google Analytics / Google Tag Manager
- • Facebook Pixel / Meta Pixel
- • Marketing and advertising tags
- • Any third-party tracking scripts
This ensures cookies are blocked before any tracking scripts attempt to load.
Correct Placement Example
<!DOCTYPE html>
<html>
<head>
  <meta charset="UTF-8">
  <title>Your Website</title>

  <!-- 1. Jerisaliant Consent Script FIRST -->
  <script src="https://console.jerisaliant.com/consent.js/...?mode=production"></script>

  <!-- 2. Then other scripts -->
  <script src="https://www.googletagmanager.com/gtag/js?id=GA_MEASUREMENT_ID"></script>
  <script src="your-other-scripts.js"></script>
</head>
<body>
  ...
</body>
</html>
Platform-Specific Instructions
Remember: Always place the script above all other scripts in your <head> section, regardless of platform.
WordPress
Use a header/footer plugin or add to your theme's header.php file right after the opening <head> tag.
Popular plugins: Insert Headers and Footers, WPCode
⚠️ Use test script on staging.yoursite.com, production script on yoursite.com
Shopify
Go to Online Store → Themes → Edit code → theme.liquid
Add the script immediately after the opening <head> tag, before other scripts
⚠️ Use test script on development theme, production script on live theme
Wix
Settings → Advanced → Custom Code → Add Code to Head
Set "Place Code in" to Head and "Load code on" to All pages
⚠️ Test in Wix preview mode before publishing to live site
React / Next.js
Add using the Script component with strategy="beforeInteractive"
import Script from 'next/script'

// In your layout or _app.js
<Script
  src="https://console.jerisaliant.com/consent.js/site_level_132_1763902188451?mode=production"
  strategy="beforeInteractive"
/>
💡 Use environment variables to switch between test and production scripts
Google Tag Manager
Add as a Custom HTML tag
• Trigger: All Pages
• Tag firing priority: 999 (highest)
• Advanced Settings: Tag firing options: Once per page
⚠️ Use separate GTM containers or workspaces for test vs production
Testing Your Implementation
Always Test with Test Script First
Use the test script in your development and staging environments before deploying the production script to your live site. The test script works on any domain, making it perfect for testing.
Testing Checklist
- Deploy test script to staging/UAT environment first
- Verify script loads first - check browser DevTools Network tab
- Clear your browser cookies and test the full consent flow (accept, reject, manage preferences)
- Check cookie blocking - verify scripts are blocked before consent is given
- Test on desktop, tablet, and mobile devices
- Only after successful testing, replace with production script on live site
Production Deployment Steps
- 1.Remove test script from production site
- 2.Add production script (mode=production) in the same location
- 3.Verify script is first in <head> section
- 4.Clear cache if using CDN/caching
- 5.Test on live site in incognito mode
Pre-Deployment Checklist
- Cookie scan completed and cookies categorized
- Banner design customized to match brand
- Privacy policy link added and working
- Auto-blocking enabled and tested
- Google Consent Mode configured (if applicable)
- Test script fully tested in staging/dev environment
- Tested on desktop, tablet, and mobile
- Production script placed FIRST in <head> section (before other scripts)
- Verified production script only used on authorized domain